As an experienced Business Intelligence specialist, Dynamics 365 finance architect and a CPA I have worked with many prospects and customers that are looking for answers to not only understand their data, but to put systems in place to gather and work with the data. This blog shares information on features, benefits, tips and thoughts around the Microsoft Power Platform and Dynamics 365 applications.
MCP Servers Arrive in Preview for Dynamics 365 Finance and Supply Chain Recently, Microsoft has introduced MCP servers in preview for Dynamics 365 Finance and Supply Chain, marking a significant leap in the ERP ecosystem. This new capability means that organizations using Dynamics 365 can now leverage MCP servers to supercharge their interactions and analytics—all while maintaining the compliance and security standards expected from a modern cloud service. What Is an MCP Server? An MCP server is a specialized, cloud-managed platform designed to handle advanced analytics workloads for enterprise applications. By offloading data processing and analytical computations from the core operational databases, MCP servers enable faster, scalable, and more secure reporting and analysis. These servers are optimized for handling large datasets, real-time queries, and complex analytics scenarios, providing organizations with the agility to adapt to dynamic business needs. You can learn more abo...
Get link
Facebook
X
Pinterest
Email
Other Apps
Dynamics 365 Finance & Supply Chain with Power Automate - Part 3 - Adding a new vendor workflow
Get link
Facebook
X
Pinterest
Email
Other Apps
-
I recently presented a session on using Power Automate with Dynamics 365 Finance and Supply Chain. The session was very well received, so I wanted to post some videos and details to help users better understand the examples I covered in the session.
In the following video I will walk through using Power Automate with Dynamics 365 Finance & Supply Chain to manage a workflow around adding a new vendor.
Business scenario – To on board a new vendor, the organization requires a new vendor request be submitted, an internal review process is used, including sending an email to the vendor with the required tax documents (W9) and instructions.
Components used in the scenario – Dynamics 365 Finance virtual entities, Power Automate, Microsoft Forms, Microsoft OneDrive, Microsoft Teams and Outlook
Synopsis – By using an Automated cloud flow in Power Automate the system can automatically manage this business process.Power Automate will listen for new vendor request form to be submitted. It will add the information to D365 (on hold), notify the AP team in Teams, and it will send an email to the Vendor attaching a blank W9 form.
____________________________________
Step one is to create a form to gather the key vendor information. In my example, I will use Microsoft Forms as it connects easily with Power Automate. It also connects with Microsoft Teams, so it is easy for users to access.
Once the form is setup, you will have the information needed to start the Flow. This will be an automated flow with the trigger "When a new response is submitted"
The beginning of the flow is to get the information from the new form that was just submitted. The form id is the form that is being used to collect the Vendor information. You will add a step of "Get response details" and the Response ID is from the trigger step above.
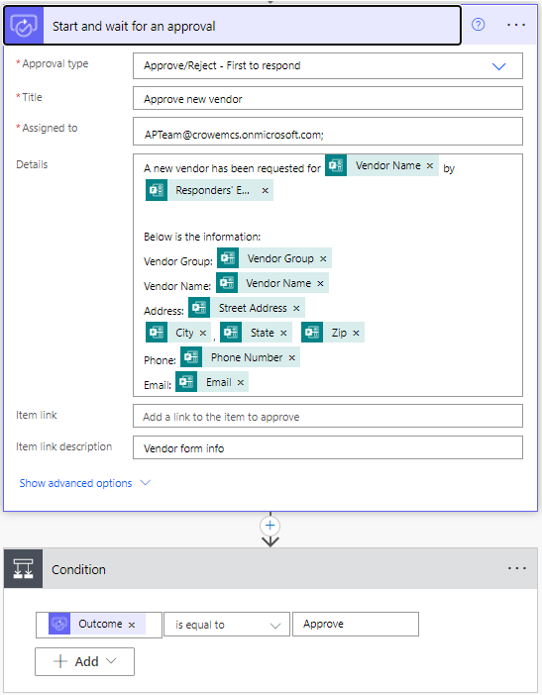
Now that you have the information on the vendor, the remainder of the flow will use that information to get approval on the new vendor, if approved we will add the vendor to Dynamics 365, put the vendor on hold, post a message to Teams, and send an email to the vendor.
First we will use Power Automate's approval functionality to ask for Approval on the new vendor. Using a condition, we will have two branches for the remainder of the flow.
If the vendor is not approved, we will simply use the Outlook connector to send an email to the original form submitter letting them know it was not approved.
If the vendor is approved, we will add the information to D365 using the Dataverse - "Add a new row" connector.
Once the vendor is added to D365, we will post a message to Teams using the "Post message in a chat or channel" connector
The last piece of the flow is to send a W9 to the new vendor. To do this, we have place a blank W9 form in our OneDrive for Business. So we can use Power Automate to get the file information. Once we have the file, we will send an email to the vendor with the file attached.
Below is a video building out the entire flow from scratch.
Hopefully you find this information helpful. Please subscribe to my blog and video channel for more information on Dynamics 365 Finance, Supply Chain, Project Operations and Power Platform.
Microsoft has recently released two Copilot applications to work with Dynamics 365 Finance & Supply Chain. These solutions are still in preview, so it should only be uses in sandbox environments to evaluate and learn how they will work with your organization. Prior to installing it is important to make sure your environment meets the requirements. Dynamics 365 Finance & Supply Chain requires the latest hotfix on Dynamics 365 Finance version 10.0.34 (10.0.1591.107) and version 10.0.35 (10.0.1627.70) and later. In addition, the solutions rely on the Power Platform and Dataverse, so it is important to have the environments connected and user security set appropriately. For more details on the prerequisites and the installation instructions you can follow the Microsoft installation documents. Copilot in Microsoft Dynamics 365 Finance Copilot in Microsoft Dynamics 365 Supply Chain Let's look at what these two copilots provide to users Copilot in Microsoft Dynamics 365 Finance C...
Are you looking for ways to automate some of your routine accounting functions, like reconciling sub ledgers to the general ledger? Microsoft has recently created some examples using Power Automate Desktop (think of it like Task Recording on steroids). It can not only automate steps through Dynamics 365, but it can also automate Excel and other applications. In one example from Microsoft they automate the AR to GL reconciliation: Automatic running of the AR aging and the customer/ledger reconciliation reports. Power Automate then extracts data from both reports in Excel and compares the balances. Power Automate then posts a Team message letting you know the subledger is in balance. Power Automate saves the reports with the date in the file name, so there is backup. Microsoft Directions & Example I working with the example, I needed to make a couple of adjustments to the sample flow that was provided but I was able to get it to work. Here is a video of the flow r...
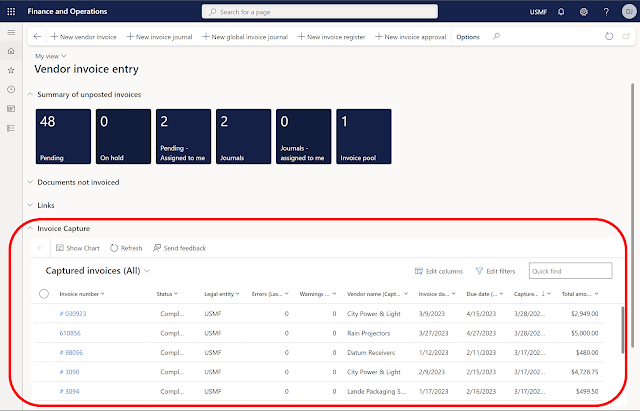
Have you ever wanted to put a website or a model-driven Power App in one of your existing Dynamics 365 Finance workspaces or forms? You might already know you can create a new workspace with a website, but did you know you can add the website to an existing workspace? Here is an example of the Vendor invoice entry workspace with the Invoice Capture Power App embedded. Prior to using this feature, you need to turn on "Saved views support for workspaces" in feature management. Once this feature is enabled you can follow the following steps to add the Invoice Capture app or any model-driven Power App or website to an existing workspace. Open the vendor invoice entry workspace From Options - choose Personalize this page From personalize menu - select the 3 dots - and then Add an app Once that is selected (the screen goes gray) - click on the section header where you want to add the app (in my example I put it in Links) On the Add an app menu - choose Website Give it a name (my e...


Comments
Post a Comment